Navigation
Install the app
How to install the app on iOS
Follow along with the video below to see how to install our site as a web app on your home screen.
Note: This feature may not be available in some browsers.
More options


You are using an out of date browser. It may not display this or other websites correctly.
You should upgrade or use an alternative browser.
You should upgrade or use an alternative browser.
Tutorial Adobe Illustrator tutorial
- Thread starter Mero
- Start date
- Tagged users None
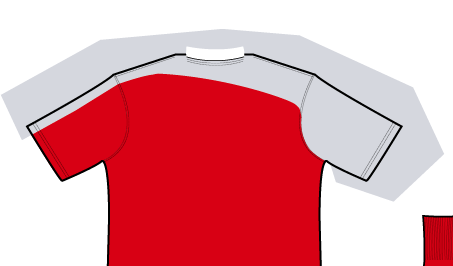
Why is there a yellow shape being drawn when I only want the points (I haven't drawn a bottom line) and how do I get the points to curve?


Bacon Warrior
D10
Why is there a yellow shape being drawn when I only want the points (I haven't drawn a bottom line) and how do I get the points to curve?
View attachment 41101
Do you have the fill on?
Problem 1 solved, thank you!Do you have the fill on?
Problem 2 about the line curving?
Bacon Warrior
D10
Problem 1 solved, thank you!
Problem 2 about the line curving?
If you hold down the mouse while using the pen, you curve the lines.
I'm going to have to get a hang of that one, thank you so much!If you hold down the mouse while using the pen, you curve the lines.
Why is there a yellow shape being drawn when I only want the points (I haven't drawn a bottom line) and how do I get the points to curve?
View attachment 41101
It's because your shape has a fill colour on it and no stroke.
To get rid of it click on your fill colour box at the bottom of your tool bar (it should be yellow here for you) and then click on the box underneath with the red line (that's the nothing/transparent box).
Then add a colour to your stroke to make the line visible (The hollow box in the same area as the fill box)
To curve the lines of the shape click and hold on the pen tool in the tool bar and several other pen options will come up. Select the one that looks like a open triangle... or press Control V for a short cut.
Then click and drag on one of your anchor points, you can also click and drag on the new points the curve creates.
Thankyou so much Spider Eater, that's so much quicker (no offence Bacon)To curve the lines of the shape click and hold on the pen tool in the tool bar and several other pen options will come up. Select the one that looks like a open triangle... or press Control V for a short cut.
Then click and drag on one of your anchor points, you can also click and drag on the new points the curve creates.
lmach
Naitanui2Yeo
Thankyou so much Spider Eater, that's so much quicker (no offence Bacon)
That's what BW said.
He said to plot the points and hold them, which I wasn't getting used to.That's what BW said.
But SE said about pressing control+V or the 'open-triangle' button.
lmach
Naitanui2Yeo
Clicking and bending the paths as you're going is easier than it is to draw straight paths then going back and bending them.He said to plot the points and hold them, which I wasn't getting used to.
But SE said about pressing control+V or the 'open-triangle' button.
Really?Clicking and bending the paths as you're going is easier than it is to draw straight paths then going back and bending them.
Ahk, I'll try both ways again.
Oh, and would you be able to help me with clipping masks? I tried to do one, but there has to be more than one object selected? I'm doing the silver part of the NZ Knights guernsey, and I need the top part cut off.
lmach
Naitanui2Yeo
Really?
Ahk, I'll try both ways again.
Oh, and would you be able to help me with clipping masks? I tried to do one, but there has to be more than one object selected? I'm doing the silver part of the NZ Knights guernsey, and I need the top part cut off.
Have a look at this, it'll help heaps:
With the clipping mask, you have to put the silver part below the base of the shirt (make sure they're in the same layer), so only the parts outside the shirt will be visible. Now copy the base shape to your clipboard, select both the base and the shape you want to clip, right click > create clipping mask (or command + 7). Now only the silver shape will be visible. Make sure that shape is under the 'designs' layer, then paste the base and line it up to where it was before. Also make sure the base is under 'base' in the layers panel. You should now be able to see both the base and the silver shape, without it overlapping.
Just did it, thank you

Mero
Norm Smith Medallist
- Thread starter
- #165
There is another option of course... murder.
Or you could get rid of the section not past of the design like this:

So you've got a silver shape over the Red jersey.
Click on the Red jersey and copy it over the top of the Silver.
I do this with shortcut keys.
So it's Click on Red, Ctrl-V, click on Silver panel, Ctrl-F
That pastes it in front of the Silver panel.
Then you go to the Pathfinder box.
If it's not open on your screen, go to Window>Pathfinder will bring it up
Then you click on both the Silver and the top Red paths (what Illustrator calls shapes)
Click on Crop in the Pathfinder box and the bit outside the Red shape goes away.
It will make it into a Group. Some of the paths (shapes) inside the group will be the sections outside Where the Red was, and they won't have any colour. Delete them.
Now your Silver panel fits nicely on the Red jersey underneath.
Or you could get rid of the section not past of the design like this:
So you've got a silver shape over the Red jersey.
Click on the Red jersey and copy it over the top of the Silver.
I do this with shortcut keys.
So it's Click on Red, Ctrl-V, click on Silver panel, Ctrl-F
That pastes it in front of the Silver panel.
Then you go to the Pathfinder box.
If it's not open on your screen, go to Window>Pathfinder will bring it up
Then you click on both the Silver and the top Red paths (what Illustrator calls shapes)
Click on Crop in the Pathfinder box and the bit outside the Red shape goes away.
It will make it into a Group. Some of the paths (shapes) inside the group will be the sections outside Where the Red was, and they won't have any colour. Delete them.
Now your Silver panel fits nicely on the Red jersey underneath.
- Sep 14, 2010
- 4,198
- 1,374
- AFL Club
- Adelaide
- Other Teams
- LA Lakers
So, I've been using the Live Paint Bucket to colour large areas of my guernsey, and I'm trying to recolour what I've made. However, this happened:
It's like that most of the way around, I just trimmed the image so it wouldn't be so big. Any reason as to why it's so rough?
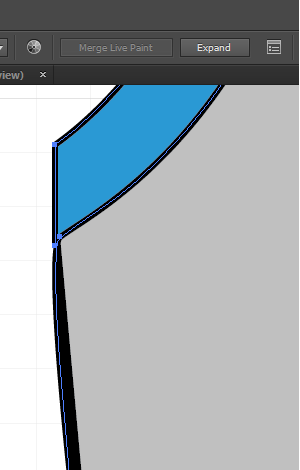
It's like that most of the way around, I just trimmed the image so it wouldn't be so big. Any reason as to why it's so rough?
Mero
Norm Smith Medallist
- Thread starter
- #167
Why use Paint Bucket?So, I've been using the Live Paint Bucket to colour large areas of my guernsey, and I'm trying to recolour what I've made. However, this happened:
It's like that most of the way around, I just trimmed the image so it wouldn't be so big. Any reason as to why it's so rough?
Is it just because it looks like Paint?
If you click on a Path (Cuffs for instance) you can then click on any of your swatches and it makes it that colour.
Can you upload the file to a File Sharing site and I can have a look at it.
- Sep 14, 2010
- 4,198
- 1,374
- AFL Club
- Adelaide
- Other Teams
- LA Lakers
Why use Paint Bucket?
Is it just because it looks like Paint?
If you click on a Path (Cuffs for instance) you can then click on any of your swatches and it makes it that colour.
Can you upload the file to a File Sharing site and I can have a look at it.
When I started, I was under the assumption that it was more like Photoshop than it actually is, so I used the Paint tool as that's how I'd do it in Photoshop.
I'll send the link to you in a PM.
lmach
Naitanui2Yeo
It was around about this stage when I was asking Mero how to cut shapes with the magic wand tool.
Hi guys,
I'm using a mac and have the Creative Cloud version of Illustrator. I have installed a font using the font book. The font appears in programs such as Open Office. But won't appear in Illustrator or Photoshop. The font is a TTF. Other TTF files I've installed, such as Marbold, seem to work fine.
Any ideas? Has been driving me nuts for about 2 hours tonight.
Jones2ByrneJones
Hour of Pessimism
- Jul 27, 2012
- 15,816
- 27,971
- AFL Club
- Port Adelaide
Might sound trivial but have you tried quitting out of it and then re-opening it? Every time you re-open the program it re-loads the fonts.Hi guys,
I'm using a mac and have the Creative Cloud version of Illustrator. I have installed a font using the font book. The font appears in programs such as Open Office. But won't appear in Illustrator or Photoshop. The font is a TTF. Other TTF files I've installed, such as Marbold, seem to work fine.
Any ideas? Has been driving me nuts for about 2 hours tonight.
Might sound trivial but have you tried quitting out of it and then re-opening it? Every time you re-open the program it re-loads the fonts.
I've closed the apps and rebooted several times. Didn't fix it.
Jones2ByrneJones
Hour of Pessimism
- Jul 27, 2012
- 15,816
- 27,971
- AFL Club
- Port Adelaide
Odd. I can't really help other with that, then, though I did find this installation thingy if you haven't already.
http://www.adobe.com/products/type/install-instructions.html
http://www.adobe.com/products/type/install-instructions.html
Mac OS X has native support for Type 1 and OpenType fonts, which can be installed just like other font type on OS X. However, fonts installed in OS X system locations are not available to “Classic” applications (see section below). Fonts installed in the OS X native environment can be accessed by (a) any user or (b) just by an individual user.
To install your fonts using a font management utility (e.g., Extensis Suitcase, Font Reserve, FontAgent Pro or MasterJuggler), refer to that utility’s documentation for instructions on adding and activating the fonts.
To install your fonts using a font management utility (e.g., Extensis Suitcase, Font Reserve, FontAgent Pro or MasterJuggler), refer to that utility’s documentation for instructions on adding and activating the fonts.
To install your fonts using a font management utility (e.g., Extensis Suitcase, Font Reserve, FontAgent Pro or MasterJuggler), refer to that utility’s documentation for instructions on adding and activating the fonts.
- Before installing your fonts, quit all active applications.
- Locate the folder that contains the fonts you want to install.
If you have purchased Adobe OpenType fonts online, they will have been decompressed to a folder on your hard drive. If you have purchased multiple font packages, each will have its own folder. - Copy or move all the font files from their individual font folders into either of the following locations. (Note that the fonts must be loose in the destination folder, not in a subfolder.)
(a) <Volume>/Library/Fonts/ Note: you must be logged on as an “Administrator” to place fonts in this location. Fonts in this location can be used by any user.
(b) <Volume>/Users/<username>/Library/Fonts/
Note: fonts in this location can be used only by the specified user. - The fonts are now installed and will appear in the font menus of your Carbon and native applications.
