- Apr 19, 2019
- 13,666
- 45,764
- AFL Club
- North Melbourne
If I don't take a scientific lens to our current plight, I will go insane.
So, for anyone interested, I'm going to spend some time, if and when I get some time, breaking down some of our stoppage work with a few key select bits, maybe three to five each week. It'll be three this week because it hurts my eyes. Mostly centre bounces, because they are far easier to track on the various apps, but perhaps some stoppages when I get a chance.
Versus Carlton summary
This was a really horrid game to watch with a midfield focus. We have a few blokes who pick and choose when to play the role they need to play at the stoppage. And our selfless blokes are doing what they think is the team thing, but lacking the nous about when to pull the trigger. This is partly created by watching the selfish stuff previously mentioned - you've seen us not hold stoppage structure, so presume we'll lose the contest and then just roll defensively. But it's a poor habit to get into when you or your player can still influence the contest.
We just can't get the mix right and I'm not sure we have the cattle to do so. The coaches' work is cut out for them.
Centre bounce 1
I'm going to send you over to Rick18 s latest The Shinboner blog post. It concerns Harry Sheezel's effort at the centre bounce which led to Carlton's first goal. Rick's work focuses rightly on what happens after the clearance and the lack of follow up work.
The only additions I'll make are to the actual stoppage work itself. They dismantled our setup in an instant.
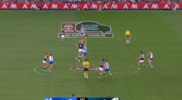
Point 1: Image 1: the kid needs a lot of time to work on his craft. You can't let a monster like Cripps get underneath and behind you.
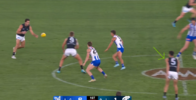
Point 2: Image 2: Powell needs to hold here. Or he needs to speak. He gets sucked in way too easily, and if you look at Cerra here, you'll see that Carlton actually had two exits, as Cerra could have rolled up to support Cripps and Hewett. Cripps chose the right one, but the other option was on too. If you look at Xerri's face, Powell's bee to honey approach also causes indecision for him - he's watching Cerra - not his job. Does he need to close down Cerra or go with TDK? No right option.
Centre Bounce 2 - from my post in the autopsy thread
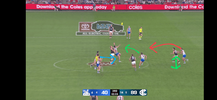
Green is what should have been done - if we win the tap, Harry is there. If Cripps gets it before Harry, he has to go backward where Parker can harass and they have to exit through the back of the stoppage. If their set play works but our sweeper stays where he should be, they run into a wall or have to dump kick. Harry did his part here.
Red is absolutely what your sweeper should not be doing. And is what he did here.
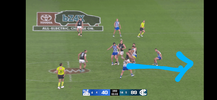
Blue is what happened. With no sweeper there to stop him, he burns straight through with the pill and hits an inside 50.
The shit thing is the opposition did this as a set play - meaning they KNEW our sweeper would try to get a cheap clearance instead of playing their role. We know this because it is an incredibly high risk low reward move for you to send your own sweeper straight through the middle of the setup, and because Cripps laid a block on Parker once he clued on.
This self-centred play from our mids needs to be stopped or we will go nowhere.
When this stuff happens it affects future stoppages - Harry then 50/50s his run as the hit-to player, just in case LDU abandons his role in that stoppage again. Parker then has to stick like glue to their sweeper next time, because he can't rely on coverage at the front of the stoppage.
This is basic. Really basic stuff. And it kills you as a footy side.
Centre Bounce 3 - Poor Wing Work
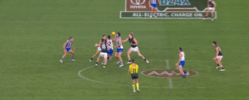
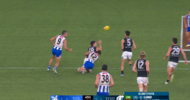
Now to balance out the previous one, I'll show one where LDU holds his line as the sweeper and it forces Carlton back. If I were to be critical I'd say he could hold a touch more central, but overall he did well, as the temptation to rush in to support Jy would've been strong. In this play, the ball went to our hit to (Jy - Image 1). We turned it over in the contest after X clotheslines Jy, and the Blues went to exit out the front, but had to double back because they ran into LDU playing the sweeper role properly. This is exactly what you want to do - if they win the ball, turn it into a shitfight. Jy hunted one player (image 2), George the next.
But.
Darcy Tucker
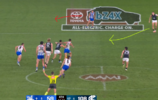
, probably trying to be selfless, decides to run defensively once he thinks we're cooked (Image 3, which is actually sequentially before Image 2). Except he pulls that trigger way too early, as he would be unable to get there in time to help even if his decision paid off.
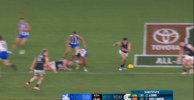
His man then sees this and holds. He then comes in to support the stoppage and wins the ball after George ran the Blues mid down (Image 4). Their other wing (not sure who was ours) then rolls up and gets the clearance. You can see the 'oh shit' turn with Tucker in image 4.
So, for anyone interested, I'm going to spend some time, if and when I get some time, breaking down some of our stoppage work with a few key select bits, maybe three to five each week. It'll be three this week because it hurts my eyes. Mostly centre bounces, because they are far easier to track on the various apps, but perhaps some stoppages when I get a chance.
Versus Carlton summary
This was a really horrid game to watch with a midfield focus. We have a few blokes who pick and choose when to play the role they need to play at the stoppage. And our selfless blokes are doing what they think is the team thing, but lacking the nous about when to pull the trigger. This is partly created by watching the selfish stuff previously mentioned - you've seen us not hold stoppage structure, so presume we'll lose the contest and then just roll defensively. But it's a poor habit to get into when you or your player can still influence the contest.
We just can't get the mix right and I'm not sure we have the cattle to do so. The coaches' work is cut out for them.
Centre bounce 1
I'm going to send you over to Rick18 s latest The Shinboner blog post. It concerns Harry Sheezel's effort at the centre bounce which led to Carlton's first goal. Rick's work focuses rightly on what happens after the clearance and the lack of follow up work.
The only additions I'll make are to the actual stoppage work itself. They dismantled our setup in an instant.
Point 1: Image 1: the kid needs a lot of time to work on his craft. You can't let a monster like Cripps get underneath and behind you.
Point 2: Image 2: Powell needs to hold here. Or he needs to speak. He gets sucked in way too easily, and if you look at Cerra here, you'll see that Carlton actually had two exits, as Cerra could have rolled up to support Cripps and Hewett. Cripps chose the right one, but the other option was on too. If you look at Xerri's face, Powell's bee to honey approach also causes indecision for him - he's watching Cerra - not his job. Does he need to close down Cerra or go with TDK? No right option.


Centre Bounce 2 - from my post in the autopsy thread
Green is what should have been done - if we win the tap, Harry is there. If Cripps gets it before Harry, he has to go backward where Parker can harass and they have to exit through the back of the stoppage. If their set play works but our sweeper stays where he should be, they run into a wall or have to dump kick. Harry did his part here.
Red is absolutely what your sweeper should not be doing. And is what he did here.
Blue is what happened. With no sweeper there to stop him, he burns straight through with the pill and hits an inside 50.
The shit thing is the opposition did this as a set play - meaning they KNEW our sweeper would try to get a cheap clearance instead of playing their role. We know this because it is an incredibly high risk low reward move for you to send your own sweeper straight through the middle of the setup, and because Cripps laid a block on Parker once he clued on.
This self-centred play from our mids needs to be stopped or we will go nowhere.
When this stuff happens it affects future stoppages - Harry then 50/50s his run as the hit-to player, just in case LDU abandons his role in that stoppage again. Parker then has to stick like glue to their sweeper next time, because he can't rely on coverage at the front of the stoppage.
This is basic. Really basic stuff. And it kills you as a footy side.


Centre Bounce 3 - Poor Wing Work
Now to balance out the previous one, I'll show one where LDU holds his line as the sweeper and it forces Carlton back. If I were to be critical I'd say he could hold a touch more central, but overall he did well, as the temptation to rush in to support Jy would've been strong. In this play, the ball went to our hit to (Jy - Image 1). We turned it over in the contest after X clotheslines Jy, and the Blues went to exit out the front, but had to double back because they ran into LDU playing the sweeper role properly. This is exactly what you want to do - if they win the ball, turn it into a shitfight. Jy hunted one player (image 2), George the next.
But.
Darcy Tucker
PLAYERCARDSTART
13
Darcy Tucker
- Age
- 28
- Ht
- 184cm
- Wt
- 83kg
- Pos.
- D/M
Career
Season
Last 5
- D
- 15.9
- 4star
- K
- 8.3
- 3star
- HB
- 7.6
- 5star
- M
- 3.3
- 3star
- T
- 3.3
- 5star
- MG
- 239.7
- 4star
- D
- 14.0
- 3star
- K
- 8.5
- 3star
- HB
- 5.5
- 3star
- M
- 2.6
- 3star
- T
- 3.3
- 4star
- MG
- 240.5
- 4star
- D
- 14.4
- 4star
- K
- 8.0
- 3star
- HB
- 6.4
- 4star
- M
- 3.0
- 3star
- T
- 2.8
- 5star
- MG
- 234.8
- 4star
PLAYERCARDEND
His man then sees this and holds. He then comes in to support the stoppage and wins the ball after George ran the Blues mid down (Image 4). Their other wing (not sure who was ours) then rolls up and gets the clearance. You can see the 'oh shit' turn with Tucker in image 4.


Last edited:


